Most Popular Use Cases for Interactive Demo Data in Hubspot

Head of Growth & Product Marketing
Intent data from interactive demos can fuel so much of what marketers track and do within their CRMs:
- ABM campaigns
- Event invites
- Email nurture sequences
- Customized landing pages
It also helps sales, giving them the context they need to tailor their conversations with prospects.
All this to say, it’s no surprise that HubSpot is one of the top integrations with Navattic.
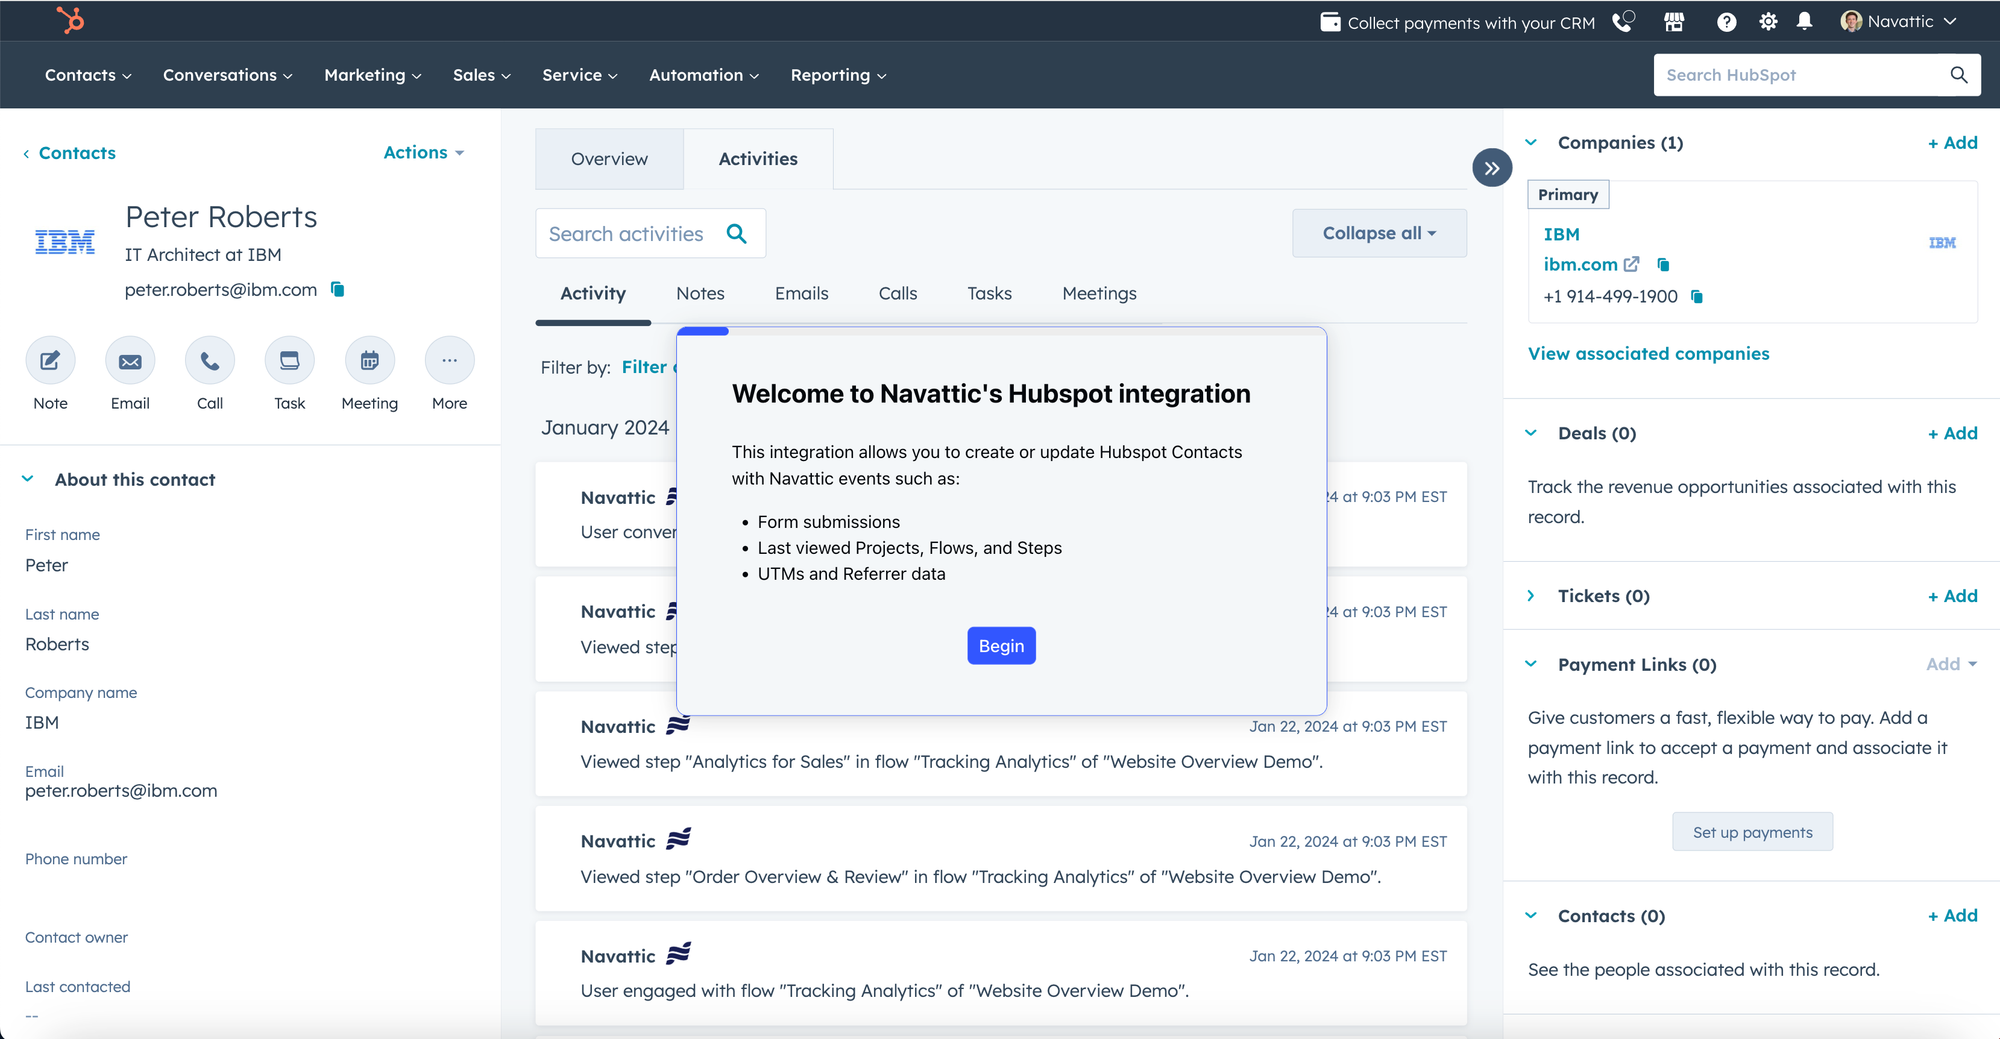
See an interactive demo overview of the Navattic + Hubspot integration
Below, we share how to connect your Navattic data to HubSpot and how to best leverage that data across sales and marketing.
How to set up Navattic + Hubspot
Learn the best way to configure your Navattic and HubSpot integration — whether or not you gate your demos.
How to send data to Hubspot if you gate your interactive demo
Option #1: Embed a Hubspot form in your demo
You can add a HubSpot form directly within your demo. To do that, you’ll need to first enable our HubSpot direct integration and configure field mapping (see more on field mapping below).
Then:
- Log into HubSpot and copy the ID of the form you want to use.
- Log into Navattic, open your interactive demo, and decide where you want to embed your form.
- Create a new step.
- Select Embed as your step type, then “HubSpot Form.”
- Paste in the HubSpot Form ID, Portal ID and Region.
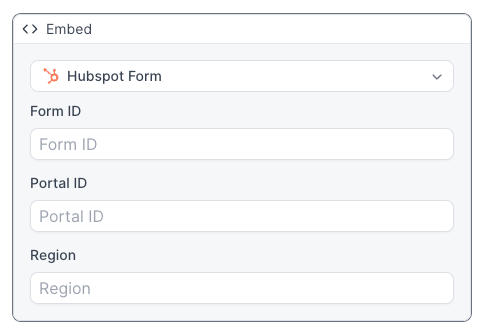
For more information on embedding forms, check out HubSpot’s forms docs.
Note: Be sure to have the HubSpot tracking code on your site to tie website activity to form submissions. The code auto-applies to HubSpot web pages, landing pages, and blog pages.
Option #2: Navattic Form + Playbooks
If you don’t use Hubspot forms you can also use a native Navattic form:
- Go to Forms → Create Form.
- Add custom text fields to the Form and click Publish.
- Find or create a Navattic demo.
- In the Flow Builder, add a Form step.
- Select the Form you published in Step 2 from the dropdown.
Once your Form is built, you want the data it collects to flow directly into HubSpot. To configure that:
- Go to Playbooks → Integrations (upper right corner).
- Find HubSpot → Manage → Connect.
- Fill out your HubSpot username and password.
- It should now show up under your Integrations as “Connected”
- Go to the Configuration tab and map all the fields you collect in your Navattic Form to specific fields on the Contact or Company in HubSpot. That way, each time someone fills out that Form, data automatically appears in HubSpot:
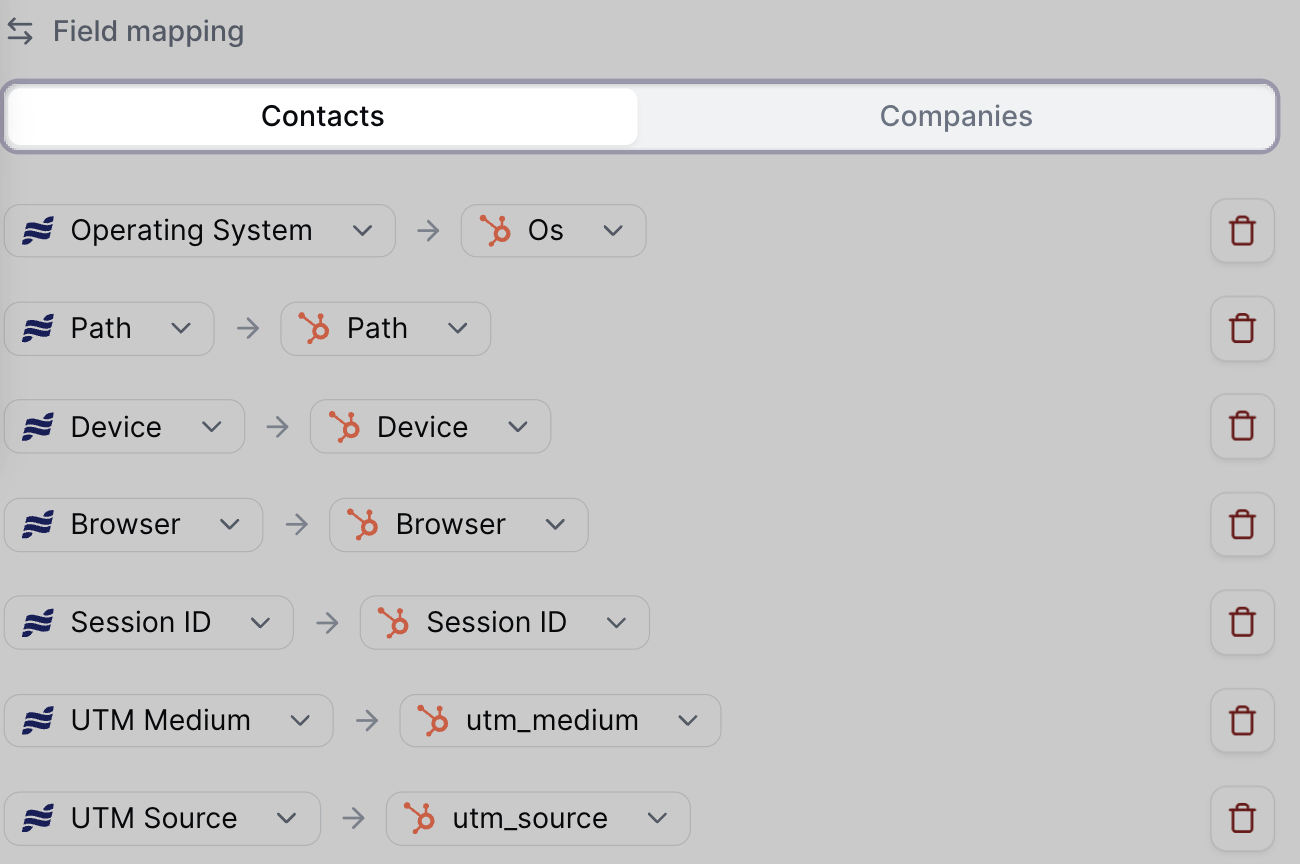
Note: For a full walk-through, see this demo on HubSpot field mapping and general integration setup.
How to send data to Hubspot if you ungate your interactive demo
Option #1: Pass hidden UTMs into a Hubspot Form*
71% of Navattic’s top customers leave their demos ungated — and for good reasons. On average, ungated tours have higher engagement rates (5%).
Plus, you can still gain insights from visitor interactions by automatically adding UTMs to your demo.
For example, if you link to a “Book a demo page” with a Hubspot form embedded in it, you can pass the UTMs using hidden fields.
To get this functionality up and running:
Configure HubSpot:
- Got to Marketing → Lead Capture → Forms.
- Select an existing form or create a new one.
- Add utm_source and any other properties you’d like to collect to the form.
- Click the form field → set each of the properties as a hidden form field.
- Click Publish.
The hidden UTM fields will automatically populate whenever a visitor navigates to your form.
Then configure Navattic:
If you embed your interactive demo, there is one extra step to pass UTMs into the embedded iframe.
- Use this resource by WickedReports to pass UTMs into the demo iframe.
- Find your iframe source (CTRL+F for “iframe src”) in your demo embed code. It will look like this:

Add your UTM_source to the end of this iframe src, as highlighted above.
3. You will now see Visitor UTMs appear in your CSV export and your Visitors tab > expand a Visitor > "Tracking" section.
4. Create your CTA button and check the “Add tracking params” checkbox.
*Available on all Navattic Plan
Option #2: Navattic JS*
Navattic JS is a JavaScript widget that identifies Hubspot cookied website visitors to your demo (even if you don’t have a form in your demo).
Install Navattic JS on any of your web properties where you will be embedding demos, identifying visitors, or passing demo events to other analytics platforms like Mixpanel or GA4.
To enable it:
- Go to your workspace Settings → Navattic JS.
- Toggle on “CRM Cookie Tracking” to track website visitors who fill out a Hubspot form anywhere on your website.
- Go to the Implementation checklist and copy the Marketing Website snippet and add it to the head of your website. It will include an SDK key that is unique to your Navattic workspace.
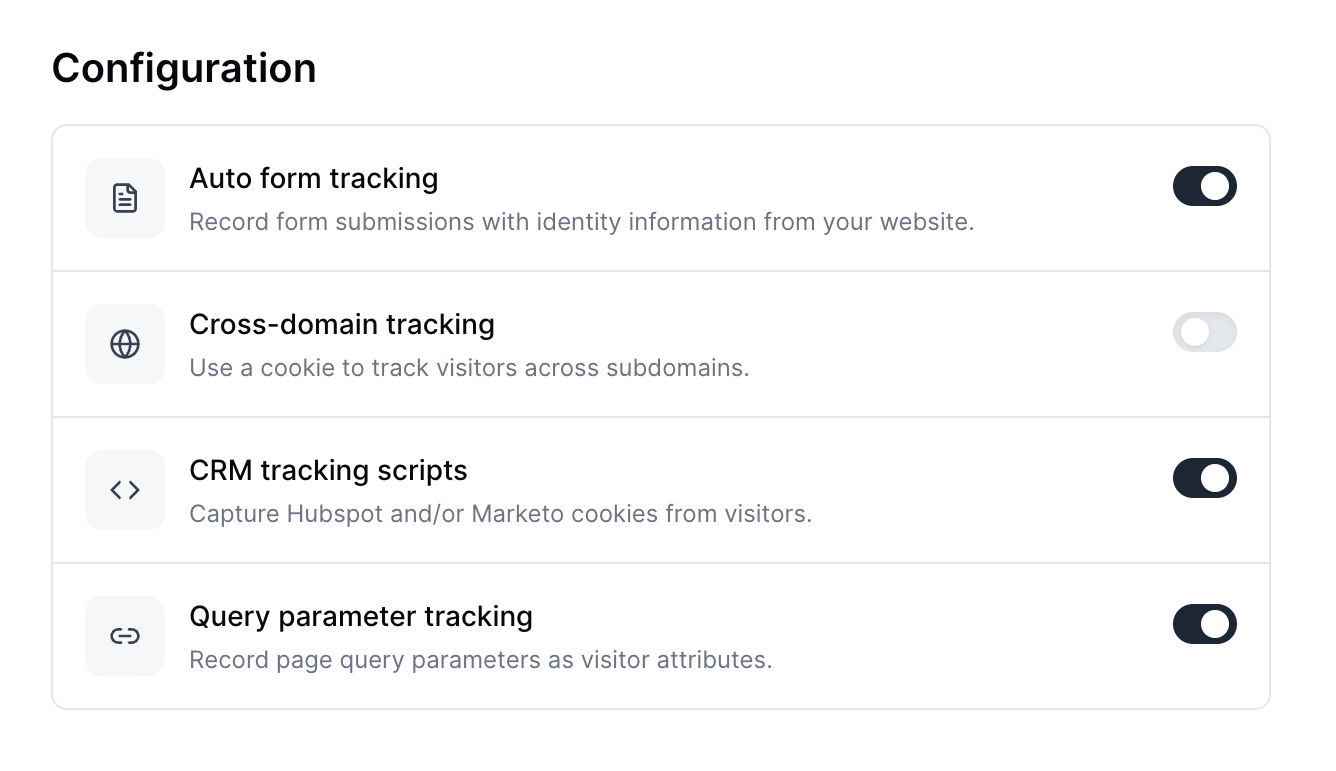
By toggling on "Automatic form submission tracking" you can automatically identify visitors who submit any Hubspot form on your website, whether or not it's to a Navattic demo.
Note: This will only work for Contacts previously cookied by the HubSpot tracking code.
*Available on Navattic Base Plan
Option #3: Account-Based Engagement + Playbooks
This option is similar to field mapping for Contacts, but you don’t need to collect the information from visitors yourself.
To take advantage, first you must have Account-Based Engagement* in your Navattic workspace. Once that feature is active, Navattic will:
- De-anonymize accounts visiting your website
- Use Clearbit Enrichment to enrich firmographic information for those accounts
- Send the information to HubSpot so it can create and/or update Companies with demo engagement data
Use the “Sync identified accounts to HubSpot” Playbook to complete this step.
*Available on Navattic Growth Plan
3 Ways to Use Navattic Data in Hubspot
Way 1: Create Dashboards to Measure Success With Interactive Demos
Depending on whether or not you use Account Based Engagement below are two dashboards to see real-time progress — one for accounts and one for contacts.
For Accounts
Most customers build a report that shows the number of accounts interacting with a demo and their associated contact stages in the funnel. To create something similar:
- Use HubSpot’s custom report builder to create a Contact + Company report.
- We recommend using a stacked bar chart so it’s easy to see how contacts at accounts that went through your interactive demo are progressing through your pipeline.
- Click the “Configure” tab, then choose the stacked bar chart option.
- Configure X-axis: Marketing lifecycle stage and Y-axis: Distinct count based on Company Name, like so:

Next, add a filter for “Company Source contains any of ‘Navattic.’”
You might also consider adding a timeframe. In this screenshot, we’re looking at contacts that entered as an MQL in the last 180 days:

For Contacts
The most common Contact-based reports we see show:
- How many leads get converted to MQLs after going through a product demo
- How many Contacts made it to each step of an interactive demo
- How many Contacts view specific types of interactive demos
In HubSpot, you can centralize this data on one dashboard, like the one we saw in the Hubspot integration interactive demo:
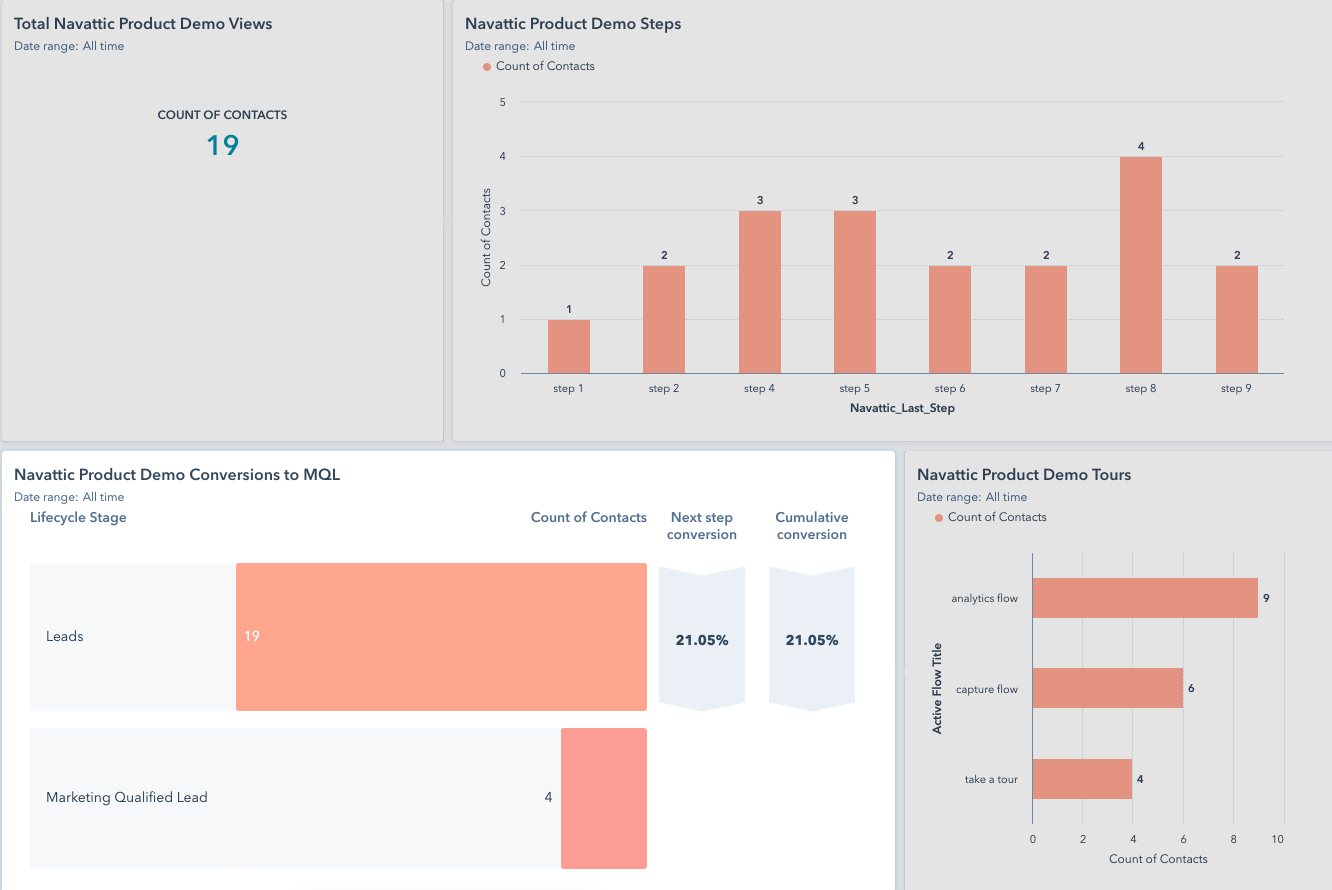
This data can help GTM teams point prospects to the more popular, high-converting demos and proactively adjust steps where there may be some drop-off.
For Contacts and Web Activities
You can also create reports for Contact and Web Activities (like demo step engagement) using data from Navattic JS. For example, create reports for:
- Week-over-week count of contacts or companies viewing your demos
- Funnel breakdown of contacts who did vs did not go through a Navattic demo
See an interactive demo of a Hubspot Dashboard using Navattic JS Data
Way 2: Use Retargeting List for Email + LinkedIn
People who go through your interactive demo have at least some intent already. Why not nurture and grow that intent with emails and LinkedIn ads?
Here’s how:
First, Establish a Navattic Identifier
- Create a custom HubSpot field called “Navattic Identifier.”
- Head to your Navattic-HubSpot integration.
- In the Hubspot configuration, map that field to our “Navattic Identifier.”
Then, Send Demo Visitor or Accounts to LinkedIn
- Create an ad audience list in HubSpot that includes all accounts or contacts that viewed your interactive demo.
- Filter by all accounts or contacts where “Navattic Identifier” is known.
- Add any relevant firmographic data, like industry, size, and location.
- Send these audiences directly to LinkedIn through Hubspot.
Note: For more LinkedIn retargeting tips, read about our internal Navattic experiment.
Way 3: Nurture Leads With Playbooks
As we’ve already introduced, Navattic Playbooks let you automatically filter Navattic data for specific Audiences and trigger specific actions in HubSpot or other integrated tools.
There are so many ways you could build custom Playbooks that interface with HubSpot. But the types we see most frequently are:
- Sending accounts with 2+ visitors to HubSpot. Shows which companies have had two or more visitors run through a specific demo of an upsell or new feature demo. In all likelihood, these folks are passing around your demo internally and may be more apt to respond to a sales follow-up.
- Adding demo visits to HubSpot timelines. Adds demo visits to HubSpot as timeline events so marketers can better understand prospect activity — for example, did they download a gated asset and go through your demo? If so, maybe you should send them X case study next.
- Tagging identified and converted visitors. Pinpoints which contacts meet specific criteria in HubSpot, helping BDRs write personalized emails to encourage prospects to view additional demos or schedule time with the sales team.
- Tracking CTA clicks. Tracks how often CTA clicks lead to conversions, helping you discover ways to improve your demo. You may also consider integrating with Slack to send these high-intent leads to a BDR or AE Slack channel.